So you want to learn how to use the CNC machine? Let's start with some basic software called Aspire. This will let you make anything from a simple name tag to a complex 3-d shape. Rather than re-create everything from scratch, I'm going to select a few of their tutorial videos for you to watch and then begin to learn the software on your own. Once you have tinkered around for awhile and are truly stuck, I will help you along.
Don't worry about messing up! The program will let you see the outcome of your work without wrecking the CNC machine. Once you have created something on the computer that you're ready to carve into wood, I'll check it before we venture over to the CNC for a satisfying session of sawdust-flinging fun.
For the full collection of video tutorials, go here:
http://www.vectric.com/support/training-material/aspire-vcp/2d-design.html
Step 1: Learn the interface (in other words, what all the buttons do...)
http://www.vectric.org/video/aspire3/2d_design/a2-interface-layout-web/a2-interface-layout-web.html
Step 2: Working with text
http://www.vectric.org/video/aspire3/2d_design/a3a-working-with-text-web/a03a-working-with-text-web.html
 Step 3: Creating a toolpath
By now, you've watched nearly 50 minutes of video and have (hopefully) spent an equal amount of time working in Aspire to try some of those skills on your own. While the videos do show you how to make a toolpath, they don't show how to create one for our ShopBot. Here are a couple of things that you need to know.
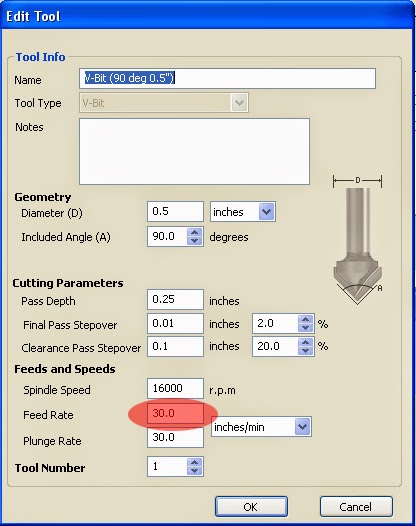
- When you choose a tool, be sure to choose the 0.5" V-Bit.
- Make sure that the feed rate is 50.0 (see illustration--I increased it a bit after some experimentation).
- When you save the tool path, you must choose the "ShopBot (arcs)(inch) (*.sbp)" selection.

- You will need to have a USB thumb drive in the computer. Be sure to save the toolpath to the USB stick.
- Important: The toolpath file is different than the Aspire file. After you export your toolpath, you must also save your working file. What's the difference?
- The toolpath file only has the codes to tell the ShopBot where to go: up, down, left, right. This will create a beautiful sign in wood (or plastic or foam or whatever). It doesn't tell the computer what font to use, only how to make the letters. This is the file that you will feed to the ShopBot.
- The Aspire file has all of the information the computer needs to edit what you have created such as the fonts and the words in the fonts. This file is useless to the ShopBot, but you must save it to make changes later.
You can create all of the toolpaths you want without fear of breaking anything. I will always check them before anything runs on the ShopBot!
Step 4: Independent Learning
Seriously, why would I do all of the work when it's been done already? Go to the link below and watch the video tutorials in order and practice in Aspire.
My suggestions to try:
- V-Carving letters
- Tracing images
- Creating a textured background
- Creating an inlay with two contrasting pieces
- Creating a 3-d shape to carve


 This piece provides a clue. That should be a flat piece of metal, but it shows obvious signs of erosion, especially as it is filed down flat. Something must be digging into this causing it to seize up. We could repair this piece, but what caused the damage in the first place?


