Saturday, May 23, 2015

The Curse of the Dual Drum Sander

It begins with a piece of machinery that always breaks.  This is our beloved Dual Drum Sander, often the last power tool to be used before the finishing process begins.  When this breaks, all work seems to stop.  We've spent hours fixing this thing only to have it break again.  The drums go round and round, but the table doesn't want to go up and down.  That seems to be a simple enough task for it to accomplish, so why does it keep breaking?


This piece provides a clue.  That should be a flat piece of metal, but it shows obvious signs of erosion, especially as it is filed down flat.  Something must be digging into this causing it to seize up.  We could repair this piece, but what caused the damage in the first place?

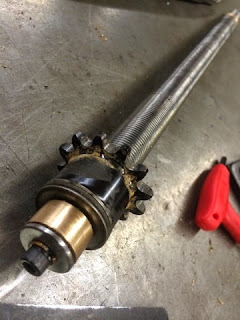
The threaded rod is supposed to turn inside this plate.  This one isn't.  A large burr has formed and frozen this in its tracks.
Here's the lift assembly as it came from the factory.

Time to make some new parts.  Rather than steel on steel, I'm going to machine a bronze bushing.  While I'm at it, I'll dress all of the original parts so that they are true and free of burrs.  In addition to the bushings, I'll have to modify the original parts to fit and add a retaining washer to keep it from falling off.

Here's the finished end with the modifications.

And the plates with the pressed-in bronze bushings.

The finished assembly is complete.

And ready to put back in the machine.  I think I'll send this to PowerMatic as an upgrade suggestion.


Tuesday, May 19, 2015

CNC Cribbage Board

Somebody mentioned making a cribbage board and the idea has been on my mind for awhile.  The biggest challenge, I thought, would be arranging 360 holes along a vector.  As it turns out, Aspire makes this quite easy.  Here's a short tutorial I found on how to do this.

Here's my first attempt.  It was pushing midnight and I'm short five holes.  I discovered that tight curves don't make for friendly cribbage paths.  My solution was to delete the holes in weird places, but then I ended up short.  This is one of those projects that's going to take you some fiddling to get right, but has the potential for a very cool project!


Update:
I'm getting the hang of this now.  One thing that I've learned is that oval or rectangular tracks are the best to keep the holes from bunching up in the tight corners.  My latest iteration is below.  Total machine time is 25 minutes, but there's the whole process of how to paint it without messing up the alignment.

Let's explore developing and selling these!

Tuesday, May 5, 2015

Resources

Now that the shop is clean, I can concentrate on putting resources online for your reference.  (Thank you all for your amazing efforts!  I couldn't have done it on my own!)

Until I get the actual web page up, look here for resources.

General Resources
(Includes time cards, syllabi, and project evaluation forms.)

Exploring Woods Resources
(Includes all of those long, pesky workbook packets!)

Woods I/II Resources
(I've lumped these together this year, but that will change next year... just wait!)
Be sure to look at the end of semester requirements and first semester grade requests.

Saturday, May 2, 2015

Tortilla Press

Abel wanted to make a tortilla press and I suddenly remembered that I had started one years ago. Together we came up with a design. Here's what I started with. Stay tuned for the finished product. 


Monday, April 20, 2015

Wood for your project?

Can you think of a use for this piece of wood?


Sunday, April 19, 2015

New resources for the end of the semester

I've been hard at work organizing documents into my Google Drive.  Keep looking there for those missing assignments that you need to find.

Here's what's new:

Bad news:  The shed project has been canceled.
Good news:  More time for projects!

Monday, April 13, 2015

Starting to use Aspire for the CNC

So you want to learn how to use the CNC machine?  Let's start with some basic software called Aspire.  This will let you make anything from a simple name tag to a complex 3-d shape.  Rather than re-create everything from scratch, I'm going to select a few of their tutorial videos for you to watch and then begin to learn the software on your own.  Once you have tinkered around for awhile and are truly stuck, I will help you along.

Don't worry about messing up!  The program will let you see the outcome of your work without wrecking the CNC machine.  Once you have created something on the computer that you're ready to carve into wood, I'll check it before we venture over to the CNC for a satisfying session of sawdust-flinging fun.

For the full collection of video tutorials, go here:
http://www.vectric.com/support/training-material/aspire-vcp/2d-design.html

Step 1:  Learn the interface (in other words, what all the buttons do...)
http://www.vectric.org/video/aspire3/2d_design/a2-interface-layout-web/a2-interface-layout-web.html

Step 2:  Working with text
http://www.vectric.org/video/aspire3/2d_design/a3a-working-with-text-web/a03a-working-with-text-web.html

Step 3:  Creating a toolpath
By now, you've watched nearly 50 minutes of video and have (hopefully) spent an equal amount of time working in Aspire to try some of those skills on your own.  While the videos do show you how to make a toolpath, they don't show how to create one for our ShopBot.  Here are a couple of things that you need to know.


  1. When you choose a tool, be sure to choose the 0.5" V-Bit.
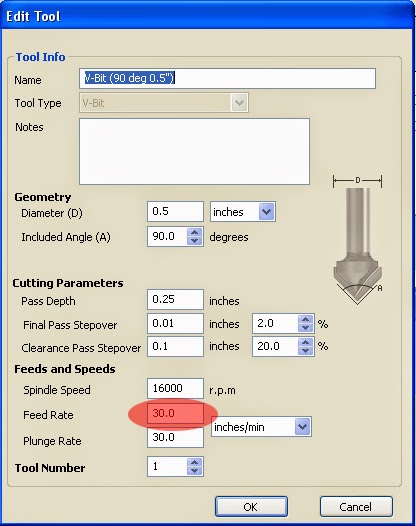
  2. Make sure that the feed rate is 50.0 (see illustration--I increased it a bit after some experimentation).
  3. When you save the tool path, you must choose the "ShopBot (arcs)(inch) (*.sbp)" selection.
      
  4. You will need to have a USB thumb drive in the computer.  Be sure to save the toolpath to the USB stick.
  5. Important:  The toolpath file is different than the Aspire file.  After you export your toolpath, you must also save your working file.  What's the difference?
    1. The toolpath file only has the codes to tell the ShopBot where to go:  up, down, left, right.  This will create a beautiful sign in wood (or plastic or foam or whatever).  It doesn't tell the computer what font to use, only how to make the letters.  This is the file that you will feed to the ShopBot.
    2. The Aspire file has all of the information the computer needs to edit what you have created such as the fonts and the words in the fonts.  This file is useless to the ShopBot, but you must save it to make changes later.
You can create all of the toolpaths you want without fear of breaking anything.  I will always check them before anything runs on the ShopBot!

Step 4:  Independent Learning
Seriously, why would I do all of the work when it's been done already?  Go to the link below and watch the video tutorials in order and practice in Aspire.

My suggestions to try:
  • V-Carving letters
  • Tracing images
  • Creating a textured background
  • Creating an inlay with two contrasting pieces
  • Creating a 3-d shape to carve


Thursday, April 9, 2015

Stuff to build

One of the great outcomes of attending a CTE (Career and Technical Education) conference is steaming pile of ideas that I collect.

Here's a link to a skateboard press that we can make:
I'd like to go a step farther and develop a profile in CAD and make it on the CNC router. Any takers?

Here's another version:


This video is good because it shows how much work that goes into the finishing process!

Here's an article on the science of skateboard design. 

I got this from a Facebook friend:
Allison Black's photo.

Wednesday, April 8, 2015

The first of the cutting boards

The first of the cutting boards are completed and oiled.


Sunday, April 5, 2015

End of the term...


The end of the quarter is nigh which means you have precious little time to get your papers turned in.  Remember that if an assignment is late, you must fill out an Assignment Recovery form.  If you turned in an assignment and don't like your score, you may correct and re-submit it.  Be sure to write, "Regrade" on it!


There will be a test on Thursday.  This will be 20 percent of your grade!  I have prepared a study guide for you.  Do whatever you can to complete the study guide, including:

  • Reviewing papers from class
  • Reviewing your notes
  • Asking a friend
  • Asking the teacher
  • Using the internet to search for the answer or additional information that might help you
I will be available during both lunches and after school on Monday (3:06-3:36) and Tuesday (3:06 - ???).

In the shared folders for each class, you will find a growing library of materials, including assignments that you may have missed.  If you don't find what you're looking for, please e-mail me and I will add it if I can.
Can I make gears on the CNC machine?  What else can I make on the CNC machine?  What tools can we find in the shop that have been buried since 1989 (I've found a few!)  What plans can I find online that we could make before June.  Here's one that I've been considering...

Or maybe...

Or just look at this guy's web site:

Monday, March 30, 2015

Woods 1 Framing Notes

Here is a diagram similar to what we did in class.  Notice that the terms "trimmer" and "cripple" are used interchangeably.

Ideas to note:

  • Studs are spaced at 16 inches on center.  To do this, measure from one corner to the first 16 inch mark.  Then offset 3/4" and make a mark and put an X at the 16" mark.  Why?  This allows panels to meet at 16" marks so that two panels can attach to a single stud.
  • In this picture, the jack stud is labeled as a trimmer.
  • If a door or window opening interrupts the 16" marking pattern, continue marking 16" centers from your original starting point.  Do not re-start measuring from a new position.
  • On the west coast, we attach a cripple stud under each end of the sill.  This is not pictured here!


Vocabulary:

  • common stud
  • king stud
  • jack stud
  • bottom plate (sole plate)
  • top plate
  • double top plate
  • sill
  • header
  • trimmer
  • cripple

Sunday, March 8, 2015

Woods 1 Production Notes

Here is what was on the board for the production notes March 6. 


Thursday, February 5, 2015

Community Service Opportunities

If you are in Woods 1 or Woods 1, 10% of your grade is community service. In two days, I have already collected these ideas for you. 

Design and build "Little Free Libraries" to be put up around the area. http://littlefreelibrary.org/

Demolish the shed in the ECE play area. 

Finish playground construction in the ECE play area. 

Design and construct a clock. See Mr. Schneider for more details on this one. 

Teach Mr. Schneider how to use the CNC design software. 

Host an elementary class field trip to the wood shop, including preparing an appropriate project. 

Stay after one day and help sort out old piles of stuff. Our last effort yielded an amazing find!

Orphan project alert!

Notice:  If you have an incomplete project in the shop, you must claim it by Monday or it will be turned over to the trolls to do whatever with. 

Joinery Notes

Here are the wood joints that you need to know for Monday's quiz:

To figure out the advantages and disadvantages of each, consider the following:

  • End grain will absorb glue.  Any joint to end grain will be weak.
  • The strongest joints are face to face or edge to edge.
  • The more surface area making contact between two pieces, the stronger the joint.


Butt Joint:


Rabbet Joint (Sometimes called a lap joint):


Here are some variations of the rabbet joint:
  

Finger Joints (3 fingers, 8 fingers, 7 fingers)


:
  

Wednesday, February 4, 2015

Getting started

ALL CLASSES:
You will receive a syllabus on Monday. 

WOODS 1 and 2:
Joinery notes. Quiz on Monday. 
Project planning. Finish before you start working. 
Clean and organize shop. Details in shop. 

EXPLORING:
Read workbook packet #1. 
Pages 1-6 are due on Friday. Use study time on Friday to finish reading and turn in. (I already received one complete packet!)
First to finish will begin working with wood on Monday. Yep!  Sooner than planned!  I just have to find all the tools. We even get to use the BENCH VISES!  (Extra credit if you make me a picture of minions playing with a bench vice!)


I showed you my "baby". Here's my current project, a stand up paddleboard. This uses most of the same methods and skills as the kayak. Hopefully, in a week or two, I will be able to showcase student projects. (But I will still update you on my projects.)

The skeleton:

The fiberglassed inlay:

Half of the planking:

(OCD alert:  Lines in this picture are straighter than they appear!)  This is after cutting and planing to a laser line. 

And the current state of the paddleboard:

Sadly, I spend so much time in the shop at school that I don't feel so motivated to work at home any more!


Welcome

IThis is the blog for the Reynolds High School wood shop program. 

My name is Erich Schneider and I will be the new teacher. I have been building houses since I was three. (I wasn't so good at first. My first claim to fame was nailing my dad's linoleum floor.)  For fun, I build various things in my own workshop, including a wood strip kayak and paddleboard. Next up is a 16' sailboat. To support my addiction to wood, I have been teaching in the Reynolds School District for the last fifteen years. 

I'm excited to bring some new changes to the wood shop program. This program is all about YOU and giving you the skills to make money doing something awesome, or simply learning a craft as a happy diversion. I've done both!

I've set up a twitter feed @RHSwoodshop where I will post announcements and open shop times. This blog will showcase our work and will also include class notes and longer announcements that won't fit on twitter. 

Next up will be a web site for class information, syllabi, grading criteria, etc.